
Author Warren Team
Here at Warren, we often rely on photographs provided by our clients to make preliminary assessments of incoming cases. Since we see quite a few client provided photos, and since we take plenty of photographs ourselves, we’ve developed an eye for what makes a good and useful field investigation photograph. We’ve also struggled with a few bad ones from time to time. Good photographs always end up saving time and money. To that end, here are ten tips to help you take better photographs every time.
1. You don’t need to be an expert photographer, but it helps to have a good camera
Fortunately, a good camera doesn’t need to break the bank. We recommend (and most of us carry) a point-and-shoot style camera in the $300-$500 price range. In this price range you will find many options from manufacturers like Canon, Nikon, Samsung, and Sony, among others. Twelve megapixels is plenty of resolution.
Digital SLR is also an option, but the bulk and weight of a full-size SLR camera will work against you over the course of a long day in the field. Point-and-shoot style cameras also have a hidden advantage over SLR types: The “macro” function, used for extreme close-ups, is usually better on a point-and-shoot than on an SLR.
Smart phone cameras will work in a pinch, but they are better used as backup cameras in case of a malfunction. The reason is the flash on a smart phone just can’t get the job done on a large, poorly-lit scene.
2. Give us your originals
Most digital cameras save images in “JPEG” format by default. JPEG is an acronym for “Joint Photographic Experts Group”, the committee responsible for creating the format. The JPEG format sacrifices a small amount of data in the raw image in order to reap a large savings in disk space. For our purposes, that small loss is invisible, and a high-resolution JPEG is our preferred photo format.
Whenever possible, copy the JPEG images directly from your camera to your computer, select the ones you want, and send them without any editing or file conversion. Every time a JPEG is changed (for example: cropped) it must be recompressed, and a bit more original data is lost. Eventually even the sharpest JPEG will become fuzzy if repeatedly saved over itself. The original JPEG file is always the sharpest.
Another reason to supply original files is that your camera includes important information called “metadata” into every shot. Among other things, important information like the date and time of the photograph, the make and model of camera, and settings like aperture size and shutter speed are automatically included in each shot.

A wide angle view of a wall damaged by fire. The area of origin of the fire is roughly centered in the frame and is indicated by the red circle. This photo gives a broad perspective to help others locate the key information. In this photo, we can’t see exactly what caused the fire, but we immediately know where we need to look closer.
3. Make sure the time is right
Remember to correctly set the date and time in you digital camera, and check it periodically. Your camera stores this information in every photo you take, whether it’s visible or not. The field investigation photo you snap today might become a crucial piece of evidence in a trial that takes place years from now. An incorrectly dated photograph can create unnecessary confusion.
4. Stay sharp
Digital cameras need a few seconds to focus sharply. Most cameras can be set to give a short beep when they are focused and ready to shoot. Be sure the autofocus program in your camera has picked the correct object to focus on. Many cameras can be set to always focus on the center of the shot, which can be useful for taking photographs of machinery. Think about how each shot is framed. For field investigation photographs it’s usually best to put the object of interest right in the center of the photo, but take a second to be sure there isn’t some distraction lurking in the corner of the shot.
5. Help us keep things in perspective
Now and then, we receive a batch of very tight close-ups of a machine or accident scene, in no readily discernible order. We sometimes spend quite a while puzzling over these seemingly-unrelated photos, and that costs time and money. Try to make your field investigation pictures tell a story. Start with broad photographs that give a “feel” for the scene. For example, begin with all four sides of a damaged car, or a series of photos documenting a manufacturing line from start to finish, etc. When it’s time to show a close-up, start with a wider view and take a series of progressively tighter shots until you’re close enough to show the necessary detail.

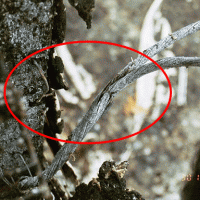
A closer view of the same wall from a different perspective. Intermediate views help to locate key areas easily. The area of interest is kept in the middle of the frame.
6. Show me the hazard
Your field investigation report is often one of the first points of data we receive for a case. For example, we might know that our new case involves a hand injury in a conveyor system and very little else. If the photographs show a conveyor with multiple in-running nip points then we are left to wonder which one is the culprit. A well placed marker in the photograph can clarify things in no time. Try to document exactly where the problem occurred and what is alleged to have caused it. If there is any type of safeguard like a barrier guard, a light curtain, or a pull cord, document it well. Try to get clear photos of any labels and warnings attached to safeguards.
7. Take better photographs in a flash
Learn how to force your camera to use its flash. When there is a strong light source behind your subject, you will only capture an outline of what you want to see. By forcing the flash to fire, you can fill in the important details you need to document.
8. When in doubt, take a few more
Don’t be afraid to take many photographs. The cost of digital data storage is falling all the time, and even large, high resolution photographs have become very inexpensive to store. Having a large selection of photographs to choose from makes it easier to tell a clear and convincing story. You almost can’t have too many.

An extremely tight close-up view of the area of origin. This photograph was produced by a macro lens. A staple pierced an electrical wire causing a short circuit that resulted in fire.
9. Trouble free transmission
The only problem with those large, crisp image files is that they often don’t fit well into emails. Rather than compress them until they fit, get familiar with one of the many available online data storage services. These can make it easy to transfer large files. Here at Warren, we use a free service called Dropbox. As a last resort, burn the originals to a DVD and put them in the mail.
10. Get moving
Most digital cameras can also capture digital video. A short, well shot, well narrated video can really tie your still images together and help you tell the story. When shooting video, hold the camera as steady as possible, preferably braced against something. Avoid that “vertigo” feeling by tilting, panning, and zooming as slowly as you can. The flash isn’t an option for video, so make sure you’ve got plenty of light available.
Founded in 1997, The Warren Group, forensic engineers and consultants provides technical investigations and analysis of personal injury and property claims as well as expert testimony for insurance adjusters and attorneys. Extremely well versed in the disciplines of mechanical, electrical, chemical, structural, accident reconstruction and fire and explosion investigation, our engineers and consultants are known for delivering the truth — origin, cause, responsibility and cost of an event or claim — with unmistakable clarity.
